


How Nerds Archive Their Files
You don't need to be a nerd to understand the concept behind making regular file backups. That's not what this article is about. This is about archiving your files. And how to do it the best way.
The goal is to be able to quickly reference a "master list" of all your files, including those which are spread out across a large collection of discs. So you can effectively locate files that you already have backed up.
Needle in a haystack
The main problem with traditional backup methods, the most common example being the process of burning to a DVD, is that once you've gotten your files to the backup disc it can be difficult to locate the files again. This is especially a pain when you want quick access to these files. You have a new client website project to create a Garden Greenhouse website and suddenly it would be hand to have that stock photography collection of flowers you downloaded last year. Great, so out of the 50 backup discs I've burned since then, which one is it on?
In a moment, I'll reveal the ultimate solution to backing up, archiving, and creating an automatic database driven reference library (or "master list") to locate your files - but first let's cover some fundamentals.
What you should backup & why:
Really, anything important to you that exists solely on your hard drive should be backed up. Project files, source code repository, your digital artwork collection, photography , stock video - whatever it is - the reason you need to back it up is two fold. Firstly, hard drives can suddenly become corrupted at anytime. Meaning you can lose all your data. A hardware solution like RAID is a good hedge against this type of scenario. Yet there is another significant reason why you'll want to make external backups. Capacity. There is only so much room on your hard drive and it's only a matter of time before you'll reach these limits.
That's why burning all your important files to DVD's (or BluRay perhaps) is a good solution - the data is stored on an external disc safe from a hard drive failure and the files themselves can be deleted from your drive since they have essentially been archived for later use.
What to name your discs
After actually burning the discs (I recommend using Nero), the next step is to actually name your backup discs with some extent of consistency. Not so much the digital name but the actual label you'll write on the disc with a black marker.
I recommend a simple naming method using numerical increments. Ex- the first disc you burn from now on is named "Disc 1", the second is "Disc 2", and all the way up to "Disc 50" or for however many hundreds or thousands of discs you might have.
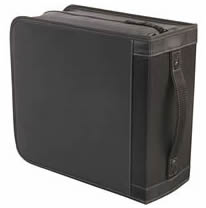
Keeping them in a quality CD wallet or binder
This is considered an essential step because after about 10 discs, those plastic cases are not going to hold up. They take up a space, start falling apart, and are difficult to seed through as you find the one disc you're looking for.
The benefit of using a CD binder is that you can see about 8 discs at a time allowing you to quickly search through your entire collection within a minute.
So the best investment you can make for your archiving process is a quality CD wallet or binder from Case Logic. There are generic brands out there but the reason why I recommend Case Logic is because they're CD binders are strong & durable. I have a couple that have each lasted almost a decade and I can still take them to a LAN or move them without the fear of having a seam rip spilling out discs everywhere.
The challenge revisited
Once you're into the routine of making regular backups and archiving files to disc it will become evident that you'll need some way of keeping track of it all.
With this challenge in mind, I've already tried & tested a number of different techniques. For example, I started with a simple Word document which included the general contents for each disc. Yet having to manually type all of this info was not the funnest activity. From there I moved on to a database driven method using Access - which eventually became too tedious to ever be practical. Then, I borrowed a basic yet useful concept from a friend which involved keeping folders of shortcuts.
A Basic Solution
The "shortcut" method is a really quick, simple way to start archiving all of the content you burn on to disc.
Create a folder on your hard drive called "Archive".
Now, burn your backup disc. When it is complete, keep the disc in it's tray and access the drive via "My Computer". Select all the files & folders on the disc, Right-Click and press "Create Shortcut". Windows will ask you if you want to place the shortcuts on the desktop - press Yes. Now cut all of those shortcuts off your desktop and place them into a New Folder within the "Archive" we created previously. Name this folder the name of your disc so when you want to see where to find the file - you'll see it's within the "Disc 03" folder.
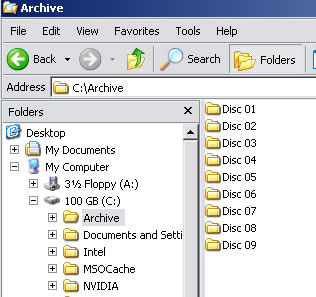
The benefit of using this method are that you don't have to manually enter the name of the files on each disc. And later on when your collection grows, you can simply use Windows' built in file search to locate a file your looking for. Then, based on the name of the CD's folder you can refer to your physical collection to find that disc.
The nerd way to archive your files
Even with the simplicity and effectiveness of the the shortcut method, it's still a relatively limited solution. And it can be annoying creating & moving shortcuts around - so wouldn't it be nice if there was a software program that could automatically read the contents of a CD, create the entries in a database and allow you to add more info such as descriptions and tags?
Why yes! The program is called WinCatalog. And it makes archiving your files an easy, automated process. Insert any disc and it will scan the entire contents. In a few seconds it then creates virtual copies of each file, stored in a "disc folder" (the name of your disc) so you can conveniently come back to reference any files you have on the DVD at a later date.
How to Create Your Own Archive Database with WinCatalog
WinCatalog is really simple, yet included here is a brief tutorial which can give you a summary of the process.
Once you have WinCatalog installed (use their free trial for now, in a moment I'll reveal how to get it for free - legally), it will start you with an example catalogue. To create your own, goto "File" > "New".
Have your first disc loaded in the tray and click the "Add Volume" button from the menu shelf. Here it will bring up your CD Drive or, alternatively, you can choose to have it archive any other volume on your PC such as an external drive.
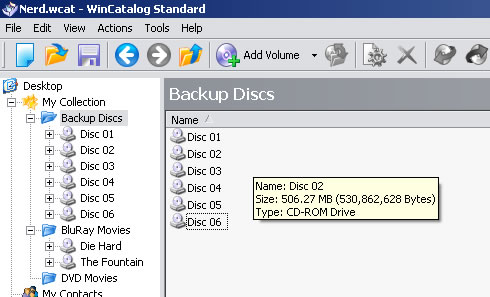
Press "OK" and let the program scan the contents of your disc. This should take less than 10 seconds for an average disc.
Once it's scanned, move on to the next disc, rinse & repeat! With WinCatalog you can easily archive your entire collection. Of backup discs or you may find it handy to keep track of other things, such as your DVD or music collection.
WinCatalog also includes a tagging feature which can give you an extra layer of organization. You can add "keywords" or tags to specific discs, or files & folders within a disc.
And finally, you can also add a description to anything you archive - which is especially useful for those of us who are archiving files for later use.
How to Get WinCatalog For Free (legally)
WinCatalog is a $50 program. It does include a trial, but it's limited to only 3 discs in your archive. So here's how to get the program for $0. And no, it's not a torrent download, this is a legitimate process.
Goto the WinCatalog site, and click the Order page (here). Skip the Quick Buy and scroll down to the "TrialPay offer". TrialPay is a service which allows you to pick an offer of equal value from a third party, such as a RealPlayer subscription. You'll have to enter your payment info, but the beauty is these offers typically include a no obligation opt-out policy which means you can sign up and cancel before they actually bill your credit card.
So click on the TrialPay link and enter your details to begin the process of selecting an offer which will essentially be the trade to get WinCatalog for free. I used the RealPlayer offer, because it was easy to sign up - and easy to cancel. Just remember to cancel! Unless of course you enjoy using the second worst software product of all time.
An Insight into Cost Effective Data Storage
What's the best format to use when archiving data? With BluRay discs becoming more common and hard drive prices lower than ever - it's an interesting time to consider your options for the best format. Reviewed below is a summary of what is available.
Data Format |
Price |
Cost Per GB |
DVD 4.7 GB |
$0.28 |
$0.06 |
DVD 8.5 GB |
$1.32 |
$0.15 |
HD-DVD |
- |
- |
BluRay 25 GB |
$10 |
$0.40 |
SATA II 250 GB |
$70 |
$0.28 |
SATA II 500 GB |
$130 |
$0.26 |
SATA II 1 TB |
$300 |
$0.30 |
The prices above based on brand name products currently available on NewEgg.com
Looking at the numbers, it is surprising to acknowledge the fact that a hard drive itself may indeed be a cost effective "external data" storage medium. At about half the price per GB, DVD's are certainly the cheapest solution but when you consider the time it takes to burn a disc, the hassle of storing them, and not to mention the degradation of read quality over time - now may be more logical than ever to begin archiving your important data on… hard drives.
At any rate, and regardless of your chosen data storage medium, backing up your data remains an important strategy. And using the tips I've outlined here - keeping track of these files is no sweat.