

How to Create a 3D RSS Icon for your Blog

For my new blog theme I created a 3D RSS icon (seen crashing into your right hand side). Making a 3D RSS icon for your blog can quickly be done using the technique I'll describe below. For this tutorial we'll be using Photoshop & ZBrush.
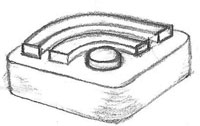
![]() Overview: ZBrush, then Photoshop
Overview: ZBrush, then Photoshop
We'll use ZBrush to create basic 3D shape of the RSS box. Then with a high resolution image of the symbol (the two lines and the dot) we will "stamp" it into the model to create the displacement & texture. ZBrush's rendering engine can then create a nice quality image. And finally, we'll bring it into Photoshop to enhance the color and make the transparent background.
Step 1 Create the Plain RSS Symbol
First you'll need a high resolution image for the shape of the RSS symbol itself. That's the two curvy lines & the dot. In fact, having it in vector format would be ideal because then you can export into any resolution you want. An Illustrator version of the RSS symbol is available in the Feedicons.com Developer Kit.
Note: If you don't have any vector software then you can simply create a high resolution RSS symbol by using Photoshop to trace along the lines of the bitmap RSS symbol.
Your image should look like the black & white symbol featured above. In PSD format with a size of at least 1024x1024 (that's about 900 DPI if your exporting from the Feedicons.com Illustrator version).
Step 2 Create the Shape
In ZBrush, select the Cube 3D tool. Draw it on the screen and subdivide the mesh 5 times until you get over 500,000 polygons. In the Tool>Deformation menu, reduce the size of the Z-Axis by about 80% to flatten it out.
At this point, we have the basic shape of our 3D RSS icon.
![]()
Above: the 3D shape created in ZBrush
Step 3 Stamp it!
I love how in ZBrush you can just "stamp" 3D objects with any 2D image file. And for the purpose of our 3D RSS icon - this stamping technique makes things really easy.
Create the texture
Before stamping, we'll need to create the base texture. First, from the Tool menu choose Make PolyMesh3D. Now that it's a poly mesh, we can apply a texture. From the color picker, choose an RSS shade of orange (we can change the color later in Photoshop). Then press Texture>New with at least 1024x1024 resolution.
Then import our RSS symbol by chosing Alpha>Import and selecting our black & white RSS symbol created previously.
Projection Master![]()
Looking straight on with your 3D object (ensure it's not being viewed at an angle) press the keyboard shortcut "G" to enter the Projection Master. Ensure Colors, Deformation, and Normalized are on while Fade is turned off. Then press Drop Now.
Here's where we can stamp the RSS sybmol on to our shape. Make sure the imported RSS symbol is your currently selected alpha.
Ensure the RGB channel should be turned on with 100% intensity and your currently selected color white. For displacment intensity, which determines how far the symbol will extend outwards, I recommend Add with 20%.
Resize the shape of your brush accordingly and then proceed to make the stamp by clicking once.
![]()
Above: the Projection Master allows us to stamp the RSS symbol on to our object
With your displacement complete - your RSS icon is just about done!
ZBrush has some basic rendering options - including materials and lighting. In this example I've used "Toy Plastic" as the material and selected "Best" from the Render menu.
When you have you're material, lighting, and rendering settings setup the way you like - choose Document>Export.
Step 4 Photoshop
Open the image from within Photoshop. To create a transparent background, simply use the Magic Eraser tool to delete the grey background.
![]()
Above: use the Magic Eraser tool to create a transparent background
In Photoshop you can change the color of your RSS icon by adjusting the Hue: Image>Adjustments>Hue/Saturation...
When you're done, Save the image as a PNG for your website. Blamo! A nice 3D RSS icon.